Pages

Showing posts with label sewcialist. Show all posts

Sunday, July 12, 2015

Super Online Sewing Match: Community Match Marianne Dress

I'm back at it and sewing for round two of the Super Online Sewing Match Community Match. The pattern that they chose for round two is the Marianne dress from Christine Haynes. Much like the Sutton Blouse from round one, the Marianne is not a pattern I would naturally gravitate towards. Part of what I love though about strictly following along with the SOSM contest patterns is altering the chosen pattern to be something that will get some play in my wardrobe.


I had a hard time figuring out how I was going to tailor this project to my personal taste. What I decided was that I would use the two-tone look of look B, but sleeveless like look A. I found my base fabric in my stash, it's an Art Gallery Knit called Stamped Grove Daylight. I got it the last time I was in Boston and went to Grey's Fabric. I was hoping to find a lightweight semi-sheer fabric for the top and then I wanted to continue part of the pattern of the dress into the yoke with some hand embroidery. I found the contrast fabric at JoAnn's, it's a light ivory sweater knit.

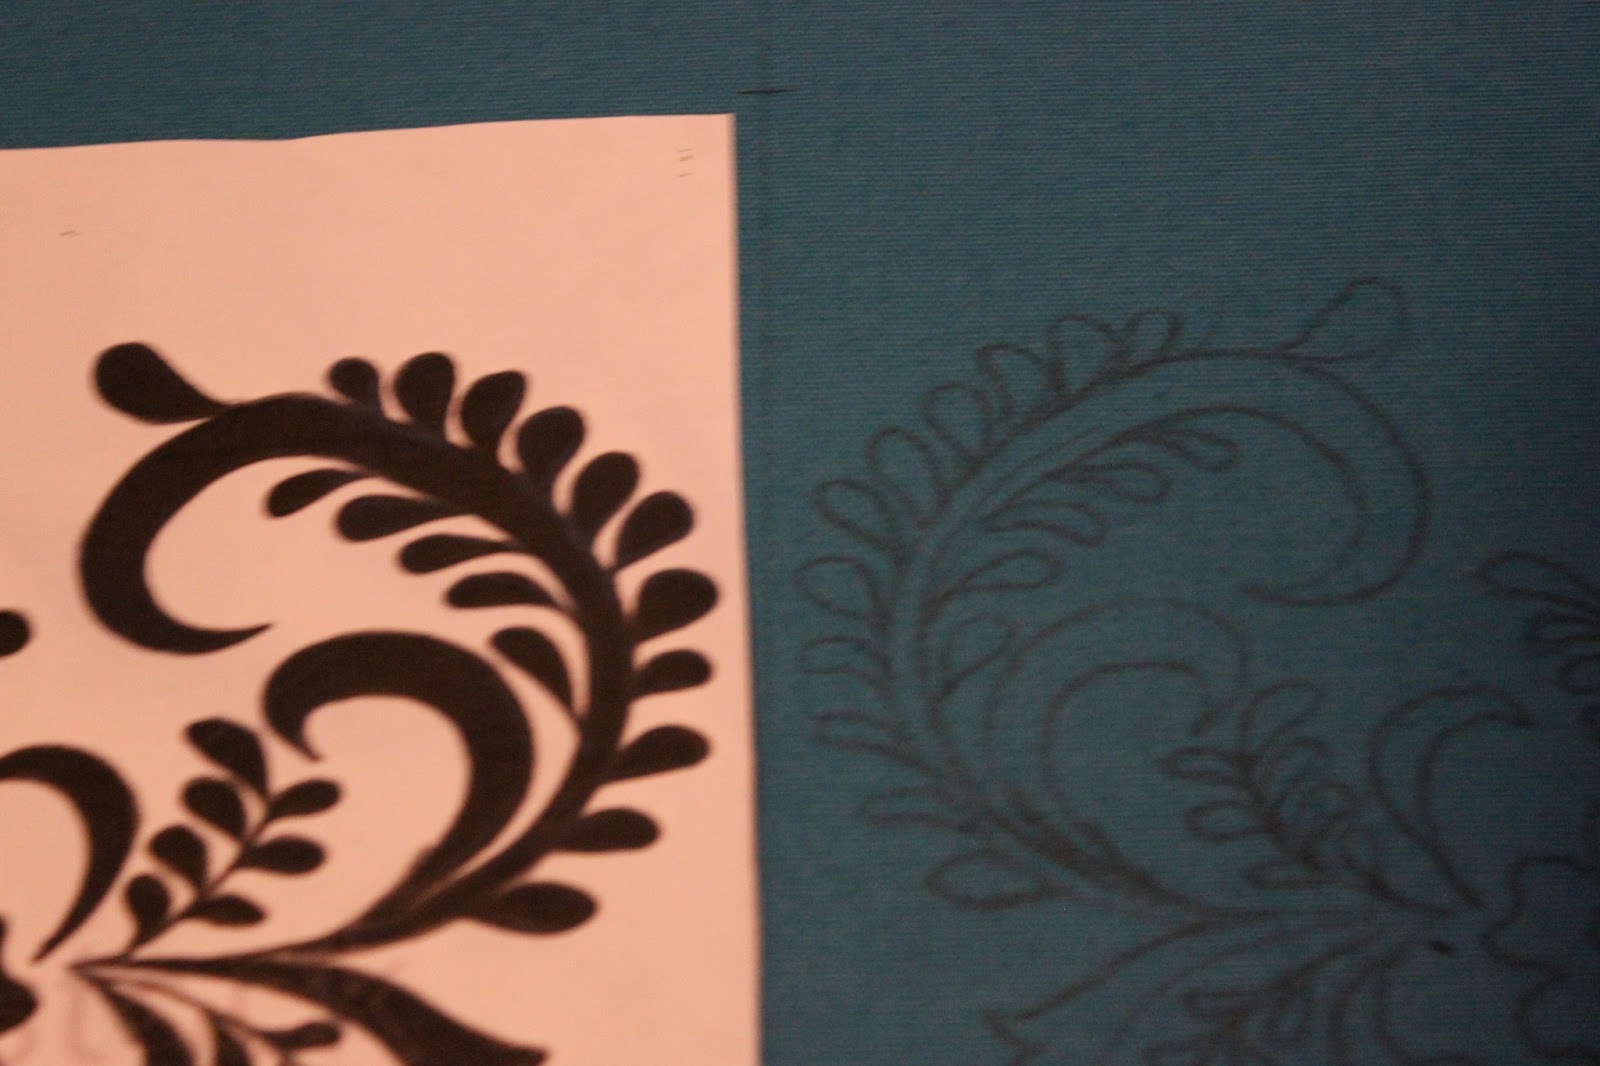
First step was to cut my pattern out. Once I marked the pattern, cut it, and I could move on to my hand embroidery. It makes it easier to do the hand embroidery before you put the pattern together. With the sweater knit being slightly sheer I could lay it over the pattern fabric and mark the pattern on the front of the front yoke pattern piece. 


One of the important things that I've found with hand embroidery, especially with sheer fabric, is to keep the traveling stitches on the back neat. I don't want to put all this hard work in on the front only to have a thread explosion on the back.


The pattern calls for the use of clear elastic on the shoulder seams and I haven't used that before. I didn't have any and I briefly entertained just rolling forward without it, but instead I popped out to JoAnn's and bought myself some clear elastic. Let me say that I am so glad that I did. The stability it provided to the shoulder of the dress was amazing. This sweater knit is stretchier than the jersey I'm using on the bottom and I was worried about the shoulders stretching out. With the clear elastic in there I need not worried anymore!


One problem that I ran into with this pattern was the neck banding. The sweater knit stretches a little different than a jersey knit, when I stretched it the banding became too thin and hard to put through the serger. What I did was to recut the neck banding 2.5" longer. That little bit of extra fabric made all the difference. It went around the neck edge beautifully.


I attached the fronts and backs of the bottom of the dress to the yoke and I was excited to see how well the pattern matched up to embroidery that I did. It's all coming together!


Once the bottoms were on there were only side seams and hems left. I put the side seams together and then I popped it on. It was a little too shapeless for me so I nipped it in at the waist and bust. I don't know that I would've made a different size all over but I could've definitely used a smaller size through the bust and waist even though I like the flow over the hip. I made a size 6 but I probably could have made a size 2 at the waist a size 4 at the bust and kept the size 6 at the hip. The size at the hip could've gone smaller if I wanted it more fitted but I like the flow of the skirt.


I used my regular machine to do the hems on the sleeves and the skirts. I do have a coverstitch machine and I entertained using it but honestly I didn't want to set it up. I was also worried about using it on the light weight sweater knit. I know that is lazy but the zig zag looks great! I will say that the pattern was pretty short. I am 5'2" and know that if I were much taller this would be a tunic top rather than a dress. To my tall sewcialists out there, be advised, you may want to lengthen it a touch.


I set up my camera and did a little mini photo shoot in the studio. It's a cute dress! It went together SO fast, with the exception of the time for the hand embroidery, I think this dress could've gone together in an hour. I also think that this would make a great top shortened. I'm glad I embraced this pattern. It was really fun!


Wednesday, February 25, 2015

Patterns by Gertie and Gertie's New Book for Better Sewing.

Those who know my sewing obsessions best know that I love Gretchen Hirsch. She writes the Blog for Better Sewing, has her own line of patterns, Patterns by Gertie, for Butterick, as well as having two fantastic books, Gertie's New Book for Better Sewing, and Gertie Sews Vintage Casual. Also according to her blog there is going to be a third book that is chalk full of dresses. EEP, I'm so excited!

Now that I've run through Gertie's pedigree for those who were unfamiliar, let me tell you why I am in love. I have never had such an easy fit from any complete collection of patterns. When I was 25 lbs heavier they fit fantastic, with the exception of shortening the hem I could walk into my size with minimal alts and it's even easier now that I've shed the extra pounds. Plus with the vintage flair of her esthetic is so firmly in my wheelhouse it's ridiculous!

Recently Gertie announced the release of her own fabric line and along with it she announced a contest using her Butterick Patterns. To this point I hadn't made one of her Butterick patterns. I'd only ever used the patterns from her book. Well the contest and Butterick Patterns being on sale at Joann's inspired me to give it a whirl.

I must disclaim here and tell you that I am not one of the finalists for the contest but I really love my dresses so at least I have three gorgeous ne dresses to keep me warm at night. I made three dresses, two versions of Butterick B6094 and one of Butterick B6019.


B6094


B6019

They were both really enjoyable to make but I think that the strapless one may be my spirit animal. It was just so right. B6094 was really breezy to make. It goes together super quick and the fold backs look really clean and satisfying.

This first black version of B6094 was my answer to the little black dress. It was easy to wear and had a clean Audrey Hepburn quality to it. The black is a cotton blend shirting and the pattern fabric is a cotton sateen. I got them both from Joanns and the sateen was even on the clearance rack and on top of it was 50% off. I think I got it for $3.50.

I added a few embellishments which were not on the original pattern plan. I did the flat piping at the underbust and waist seaming. I also used horsehair braid on the hem to give it a really satisfying swish and flow.


I love how this pattern shows off my tattoo. This tattoo was my very first by the way.

The second version I did of B6094 was out of this really great patterned fabric. There were a few challenges with this one initially. First and foremost I didn't have quite enough fabric to start with let alone extra fabric to pattern match. I laid it out very carefully and marked everything out before I cut anything. I painstakingly matched the pattern on the center back seam. My mother always told me that how you could tell a garment was of a good quality was if the pattern matched across the seams.

The foldbacks are out of a natural linen and the fabric is Pernilla's Journey Linen Blend Parrot JungleVanilla, (the link is to another colorway of the same pattern, the don't have any of this colorway left.) I got it from fabric.com.  On this version again I did the flat piping on the waist and underbust seams. I think that doing it here helped to break up the heaviness of the pattern and kept it from being overwhelming. I also did covered buttons out of the patterned fabric to go on the fold backs.


Also just on a side note I look just like my mom in this picture. There is a picture of her here, in my post recommitting.


This is the slim version of this skirt. I really like it and it's not overly slim so it still has great movement.


Do you see that pattern matching down the center back!!!


Again THE PATTERN MATCHING!

The next dress was my favorite, my spirit animal, and the one I should've submitted to the contest but alas I didn't, I chose the patterned dress. Ah well no use crying over spilt milk. I still LOVE this dress!

This dress was one of the more complicated patterns I've done. It had shirring much like the Gertie's Shirtwaist Dress I wrote about on my post Humbled by a Dress. The difference here is that rather than six rows of shirring there were two big panels of it. It also had these fabulous shaped bust cups. It fits like a dream and the shirring really helps it snug right up to the body. This is a super sexy dress and I would absolutely make it again.

The fabric was another cotton sateen clearance rack find from Joann's. My mom gave me a Joann's gift card for Christmas which allowed me to go a little hog wild at the beginning of the year.


Again this is another instance where I look like my mom and my grandmother. I love the romance of this dress.

I had so much fun sewing these dresses. As you can see I also had fun shooting them. My friend was looking to get back into photography and very kindly offered to shoot for me. She is really talented (obviously) and took these great shots. Not to mention the fact that we were out living it up a bit in the process. We had a blast, so much fun in fact that we're shooting again this evening. More posts about my latest creations soon!

Friday, August 2, 2013

Yeah I did the embroidery by hand, because I don't like machine embroidery (period)!

***Disclaimer: My above stated aversion to machine embroidery was a bit aggressive, I was feeling a little heated and for that I apologize.***

As I said in a previous post I am working on a new a-line skirt for the competition on SewMamaSew. I told a woman at a fabric store that I was embroidering the hem and then I showed her.  I pulled out what I was working on and she exclaimed, "Oh you're embroidering by hand! Well thats not very practical, what could you sell it for?"

Ok I'm sorry, sometimes its not about what I could "sell it for" because I'm not making it to sell.  I making it for myself to enrich my wardrobe and display my creative side.  Maybe that's something that happens when you own a business, even one creatively based, you stop seeing art and start seeing dollar signs.  I don't usually like to knock the way another cat swings, but I am really tired of having my passion quantified for the dollar value.

One more rant/tangent.  I do not really like machine embroidery.  I think that it looks grannyish and very unhip. I know this is coming from a girl who thinks sewing is a rip roaring good night, but still, I hate it. I think that it looks flat and well machine made, I know obviously, but I think it lacks the artistry of hand embroidery.  I know that I am ranting but I was honestly a little but offended.

Ok, I'm cool now, I'll tell you how I'm doing it.  I started with a floral silhouette and used graphite to transfer it to my fabric.  There are transfer papers you can use to transfer your images to your fabric but, I didn't have any so I had to be creative/ I was too lazy to drive out to get some.  I took a pencil, I used a 9H because I find that the softer pencil makes it easier to shade the whole back of the image.


I drew out the outline of my pattern piece onto my fabric, but I didn't cut it out on the line yet,  I am going to wait till it's all embroidered and pretty.  Turning the image with the right side facing up I placed it there I wanted it just off center front.  I then took the same 9H pencil and traced the image which transferred the image to the fabric.


I used the corner and side edge of the paper and lined them up with a line I drew down center front of the pattern piece and a cross hatch to match where the corner should hit.  I made these marks because I wanted to transfer my design to both sides of center front and I want it to be symmetrical.  I did have to go back in after my transfer and redraw some of my lines that transferred too faintly.


In order to transfer the mirror image I flipped over the paper with the right side now facing down.  I matched the center line and the hatch mark with the proper corner and edge of the page.  Though I can't see the face of the image the lines I traced the first time are raised on the back of the paper.  I then retraced those lines and because I used a pencil on the front side by retracing those lines I transferred a mirrored version of the image.


Voila symmetrical mirror image pattern transfer.

Now for the embroidery itself. If you are looking for some really great stitch tutorials, I suggest Sublime Stitching's tutorials.  *Side note: They also sell some really great embroidery patterns.  They do paper patterns as well as PDFs*


I wanted my embroidery to use lots of different stitches and techniques so I taught myself a few different ones.  I also liked the effect of combining different colors of floss to create more dimensionality.


Here is a close up of one of my process shots.


My pattern was a little bit bigger than my hoop so I had to move it to complete my whole piece.  So here is the first half:


Now I just have to repeat this pattern on the opposite side to complete my skirt.  Once I get that done I'll post my finished skirt.  Stay tuned!