Pages

Friday, August 23, 2013

Coffee Date Dress becomes Peplum Blouse.

Recently I discovered Project Sewn.  It's a pretty great website that hosts sew-a-longs and fashion sewing contests.  Long story way short, it's awesome.

Their latest sew-a-long is the Coffee Date Dress by The Selfish Seamstress.  It's a free, that's right I said free, pattern available on Burda Style. It's a really cute pattern, yet it remains simple enough that you can really personalize it.

I really enjoyed it although I have to say I do not relish printing patterns at home and taping them together.  Not my favorite thing ever.

I decided a couple things about my version of this fantastic dress.
  1. I did not in fact want a dress.  I wanted a peplum blouse.
  2. I wanted a 40's esque 3/4 sleeve.
  3. I was  not sold on the ruffle but I was willing to give it a shot.
I did try the ruffle but it was not for me.  I am a busty lady and lets just say it did me too many favors in that region.  It had to go.  The last thing this womanl needs is a blouse that makes my girls look even bigger.

Also I don't know why exactly but I just thought that this dress was primed to be a peplum blouse.  I have been looking for the right pattern and opportunity to make one and this just felt right.


I did however run into a little snafu.  During my debate over the ruffle I put it on and then tried to take it off one more time with a seam ripper. I succeeded in ripping a hole in the top right near the neck edge.  So I made a decision, I was going to save it.  One of the best pieces of advice I've ever received was, "If you can't fix it, Feature it."  I took that to heart and that is how I ended up with this detail:


 I love it and I think it's great!  Next thing to tackle was the sleeve.  So I drafted up a pattern and got on it.  On thing I really wanted to do was add fullness at the cap.  Mission accomplished.


It has some great tucks and pleats and it's comfy!


I really love this coffee date pattern.  It was great to test out and make up.  Till next time.
-Caroline

Friday, August 16, 2013

Fall For Cotton: Vintage Sew-A-Long

One of my favorite blogs is Lucky Lucille, and she is putting together a fantastic vintage inspired sew-a-long for the fall.  The theme is Fall for Cotton and the only restrictions are that you have to use fabric that is 100% cotton and a vintage silhouette from the 1920's-1970's.


After going through my fabric I have found three pieces that I really like.


I want to make a day dress, but use very intricate period details.  I'm not sure if that means delicate pintucks or cut work but I'll land on that soon.   First thing I have to do is to go through my research and figure out what I really want.  Here are some of the images I really like.


What I love about the 1940's silhouette is how it accentuates the waist.  As a curvy lady myself I like to call attention to my waist because it's my smallest part.  When your waist looks so small your other assets look so awesome!

Well I guess it's time to get cracking. Check my next step soon.


Saturday, August 10, 2013

A surprise? For me?

This may sound schmaltzy but If I could give a gift to every person I know it would be that they be allowed feel loved the way my wife loves me.  

Perhaps I should give a little backstory.  My wife and I are very different.  I am very crafty, chaotic and creative, where as she is is pragmatic, scientific, and a bit of a neat freak.  Before we met she did not know anything about sewing.  My background is in costume design and construction, she didn't know that people did that for a living.  When I told her that I spent my days working for a theatrical costume shop, she literally had know idea that it was something people actually did.  

We've been married for two and a half years now and together for almost four years, and she now knows an ever increasing amount about what I do.  I'm not saying she sews (though she did make the the eyeballs for her Mr. Potato head costume), but she knows terminology and she knows what machines and tools I like.  Once in awhile she'll throw out something like, "Hey that's a nice placket" and I am so impressed that she knows what a placket is.  


Yesterday I was spent the day getting some work done and doing some cooking and she went and hung out with some friends.  I was a little lonesome all day and basically I was being a little bit of a brat, though I tried to keep it to myself.  She came home and said that she had a surprise for me.  She had me close my eyes while she got something from the car.  When I opened them I saw this:


Some of you may know what this is, others of you may be wondering what could possibly be in this simple looking black case.  When I opened up my eyes I knew what this seemingly ordinary case contained.  This is the carrying case for a Singer Portable Electric Sewing Machine 221-1, more commonly known as a featherweight.  Our friend Jenny's fiance Todd has a passion for fixing old sewing machines and this is one of his finds,

These machines began being made in 1924.  I'm still trying to date mine but I believe that it was made prior to 1950. They are beautiful and extremely easy to use.  Not only that but the machine is all metal. You may not know this but for the most part metal machines last longer and function better than plastic machines.  I mean there is a reason that these featherweight machines are around as many as 90 years later and still stitching.  

This case has a tray which sits atop the sewing machine when it's in the case.  It has a spot for bobbins, the petal, and all of the feet.  There are so many feet for this machine and I will honestly tell you that I have no idea how most of them work and I am eager to learn. I'm going to be embarking on a mission to learn how all of the feet work and I will be dreaming up a project to go with each foot.


This machine is white hot and I am currently working on my first project on it.   I am working on another Hawthorn from Colette Patterns, but this time I am going to make the blouse version.  The stitches are incredibly even and the machine is so quiet!


Isn't she a beaut! I will put up a post about my new Hawthorn with special attention on how to make and pattern my sleeve.

I love my wife and all the ways she understands me, appreciates me, and indulges me.


Tuesday, August 6, 2013

Studio Overhaul...It begins.

This spring I went away to work as a Co-Craft Shop Supervisor at the Opera Theatre of St. Louis, or OTSL.  It was great and I had a wonderful time.  The slight hitch happened when I got back.  I basically dropped everything in my studio space and left it to be a hot mess.  AHHHH!

Then on top of that I was wicked lazy and basically started just pushing things to the side of my table or onto the daybed rather than put stuff away.  Well last night I hit my breaking point and my overhaul began.  Here is what it looked like before I got started:


Ok, I am honestly embarrassed to show this to you guys. It was in quite a state.  I must say that I am not a tidy person, but I did marry one.  When a space gets to the point where I can no longer work in it because it is too chaotic, that means it is BAD!

So while it is not done yet, here is the work on my desk and my fabric/supply shelves:


It already feels so much better to me. I am actively excited to finish the rest of the room.  Stay tuned for the rest of the mini projects in the studio.  Can't wait! Hooray!

What does your craft space look like? What is your favorite part?  I'd love to see it/share it.  Can't wait to hear from you all.

-Caroline

Sunday, August 4, 2013

Tailor it, Personalize it Customize it: Down and Dirty Simple Hems.

I have decide to do a new series of mini posts in between my longer ones.  One gift sewing has brought to my life is that even when I buy an item of clothing commercially I have the ability to get the perfect fit, hem length or custom detail.  My goal in these posts is to show you simple things that you can do to achieve the same tailored success.

As is usually the case with my sewing projects I have decided that Deb (my wife) should have her alts done first.  This is how it usually works in our house.  Deb says, "It would be great to have a (insert item here), that does (insert function here)." Then what happens is the Elves (they would actually be me) make it happen.

The first project I am going to be getting into is shortening two pairs of Deb's pants.  She was very insistent that I tell you that she got these pants for $7 on sale at Eddie Bauer! In her words, "These are not $7 pants! But I got them for $7."  That's my baby, always psyched to get a deal.

Step 1:
Try on your pants and have a friend help you pin up the extra length.  To get a good fit it is important to be looking straight ahead with your hands at your side.  Have your buddy roll up the cuff until you get the desired hem length on the pant.  Pin it in place on the front and the back and then take off the pants.

If you have one leg longer than the other repeat this step on both legs.  Otherwise you can measure and match the amount you're going to shorten the pants based on the first leg.

If you are shortening the pants solo then what I would suggest is cuffing the pants to where you think the hem should be.  Then assess the hem in a full length mirror to be sure you are happy with the new hem.  Pin it in place before you remove your pants so you don't lose that measurement.


Step 2:
Taking your marking tool, I like a tailors crayon, and mark the folded edge of the cuff you have pinned in.  Make sure you mark on the front and the back and mark on the wrong side of the fabric.


You can then unpin the cuff that you have made.  Turn the pants inside out so that you can see your marks.  Measure the distance from the current hem to your marks on the front and the back.  These two distances should be close.  If they are different I always like to use the shorter measured distance.  This way I cut off less of the pant.  You can always go shorter, but once you cut it off there is no going back.

Step 3:
On these pants in particular I am doing a 1" roll hem.  That means that the total amount of fabric in the whole hem is 2 inches.  The distance from the current hem to where I want it to sit is 3.5".  That means I needed to cut off 1.5" total.  I marked a line 1.5" up from the original hem


Step 4:
Cut off you're extra fabric on the line that you marked.


Step 5:
I marked two inches up from my cut line.  This give me a line to fold to.


Step 6:
Fold the raw edge up to the line and press.


Step 7:
Once you have folded and pressed the hem up to the line that you marked (up 1"), you are going to fold the fabric up one more time. Now press and pin.


Step 8:
Next step is to sew.  Put that bad boy through the machine!

FINAL STEP:
Get your wife to throw those pants on and show off your handy work.


When at all possible get a Great Dane in on the action.  If you have one named Orson all the better.


That's a good looking wife, I mean hem, I mean Great Dane....AHHH I mean you're all pretty!

Saturday, August 3, 2013

My Wife is awesome and now I have a new project

My wife is an amazing woman!  Last night I came home from work and she surprised me with a new tablet.  I was like "WOH!".  I have been coveting the Samsung Galaxy Note 10.1 for a long time.  It has a stylus which allows me to draw easily and I can use it for planning out patterns and dimensions.

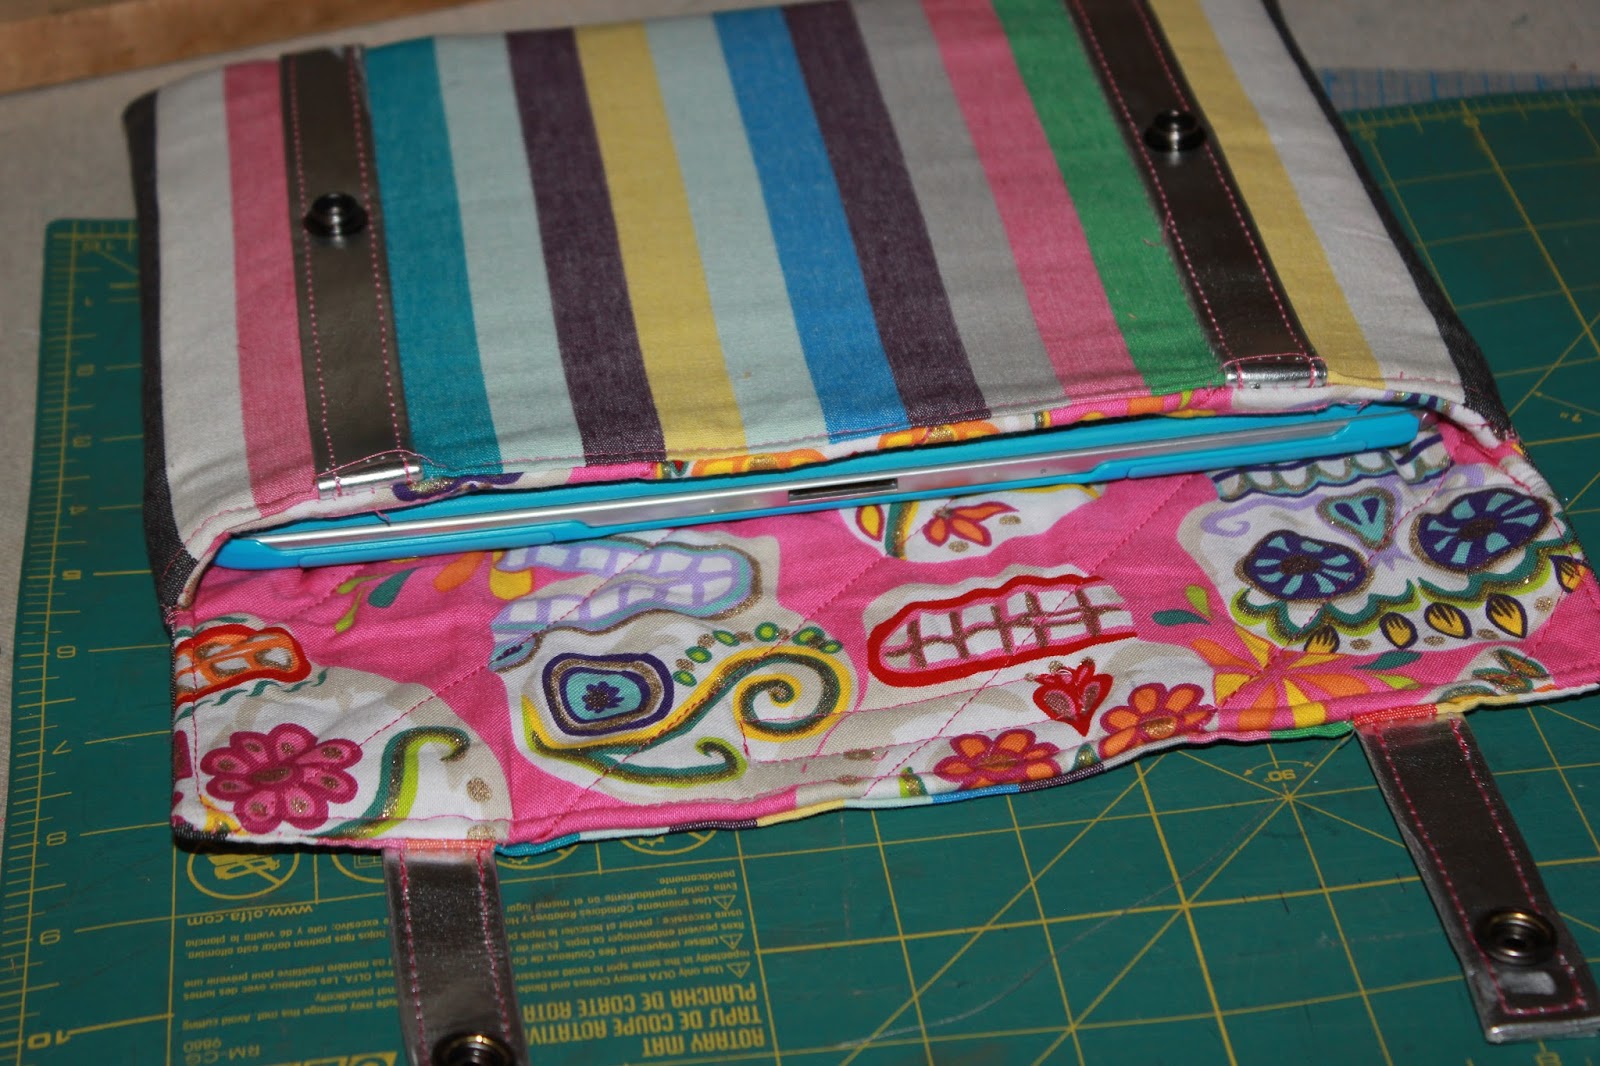
Well of course when you have a new piece of technology you want to make sure it is protected, and if you are anything like me, you want it stylishly protected. That means it's time for a tablet case. First order of business was to take measurements and plan out the size of my case and its pattern pieces. I planned them all out on my new tablet! Very exciting.  My tablet is 10.5" x 7.25" x .5" and that is how I got the basic measurements

***Please note the the dimensions listed below do not have seam allowance added to them and thusly you will need to add the amount of seam allowance you are comfortable sewing with.  I have added a half an inch to each side.***


Based on these dimensions here is what you would need to complete this project:
  • 1/2 yard of upholstery weight fabric or vinyl for the exterior
  • 1/2 yard of quilter's weight cotton or lining for the interior
  • 1/2 yard of batting
  • 1/8 yard of vinyl for the straps or 45" of strapping
  • A ruler (I prefer clear quilting rulers)
  • A pen or pencil to mark with
  • Scissors (I know obvious but there you go)
  • 2 sets of Line 24 snaps (thats what Tandy calls them) or Heavy Duty Mighty Snaps (stupid name, but that's what Dritz calls them.  Stupid)
  • Matching thread

Using this stripe fabric made it easy to measure and center the portion of the stripe I wanted.  I really like this multi-color color stripe.


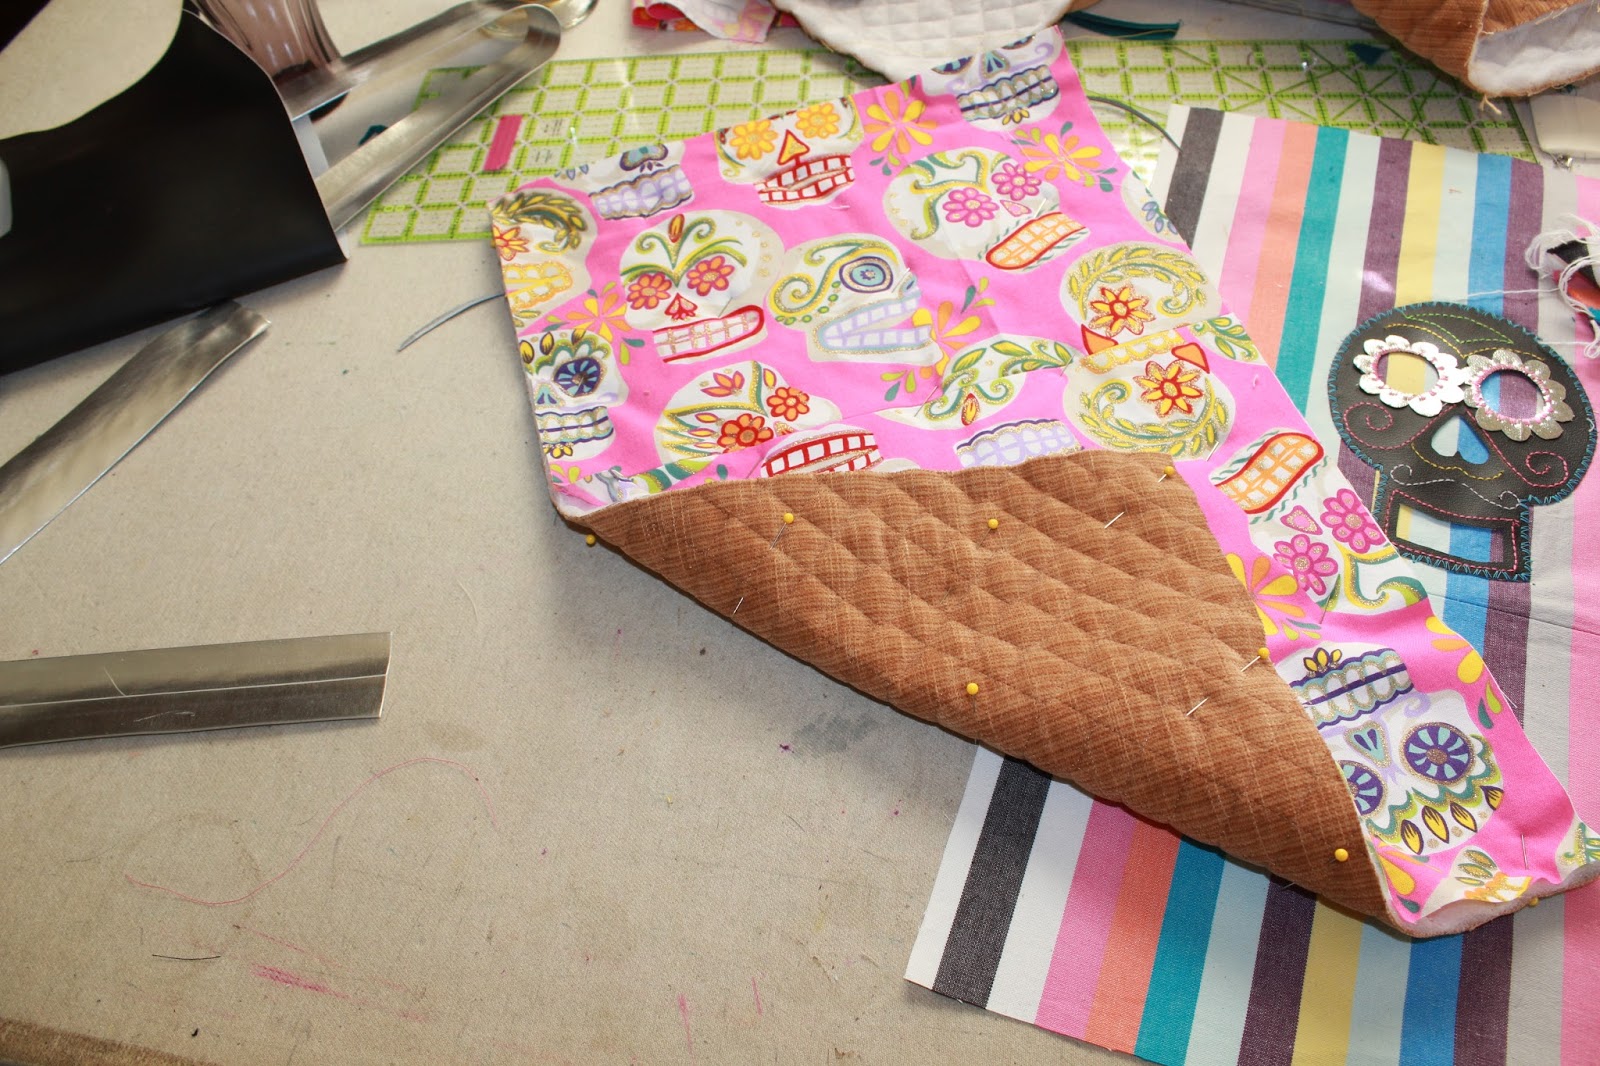
I then drew and cut out this sugar skull shape from black vinyl.  I did some decorative topstitching on it before zig zagging it centered on back pattern piece

*One thing to be careful of if you are going to add an applique on the back of your case is that it doesn't extend into the portion that will be your flap. Also if you are planning to add straps you want the to make sure your applique isn't wider than the distance between the two straps.  After taking my measurements I knew that my applique had to be smaller than 7.5" tall by 6.5" wide.  


After I had my sugar skull decorated to my taste I zig zagged it onto my fabric.  


The pieces on top is the back of the case and the smaller rectangle on the bottom is the front.  The reason the back is larger is because it has the 3" of the flap at the top.


With right sides together you are going to seam the back and front pieces together at the bottom edge and press your seams open.


After you've seamed these together and pressed your seams you can apply your straps and batting.  I chose to use some silver belting I had left over for my straps.  What was really convenient about the striped fabric is that it makes it really easy to line up the straps and keep them parallel.


I had some quilted batting left over from another project so that is what I'm using as an inner lining for my tablet case.


When I add batting as an inner lining I like to quilt the batting to the lining fabric.  This helps to unify the pieces and keeps the inner lining from shifting.


Pin at multiple points along the fabric on the side you plan to have face up when you sew.  I would suggest marking the line you plan to stitch on or if you are using fabric which is already quilted you can stitch on that quilt line.  That is what I did with mine.


It's a little time intensive but it's worth it. I think it really helps the end product to be clean and precise. Plus it's cute!


Now for the straps.  If you are using pre made strapping or a strip of vinyl or leather all you need to do is pin it where you want it and top stitch it in place.

*When you are topstitching your straps down don't stitch into your seam allowance on the flap edge.  You need this to be free so that you can turn that top edge later.


With my belting I had to baste it down before topstitching because I needed to fold my belting in half before topstitching. By pre stitching this open it will make things easier to stitch when it's folded.


I also folded in the open edge of my belting so that the edge wasn't raw. I did this to clean up the look of the strap.

I totally forgot to photograph the next step in a fit of exhaustion.  I have diagramed the next step here. You should start with the exterior fabric and stitch it at 1/2" seam allowance (or whatever seam allowance you've decided on).  Next stitch the lining together in the same way but stitch the lining at 5/8" seam allowance.  Stitching the SA (seam allowance) slightly larger on the lining it makes it easier to fit the two pieces together later.


So I hope that was clear. I felt like a dufus! Bad Caroline! Once you've made those seams in the next step is to stitch the two pieces together and bag them out.  Each piece should look like a little pouch. What you need to do is turn the lining with the right sides facing out, which means your seams will be inside of the pouch.  Place the lining inside of the exterior pouch and line up the seams and pin them together at the seams.  Clip into the seam allowance almost to the stitch line, at the point where you back stitched 1/2" from the top of the front piece.  This will make it easier to manipulate the fabric when you put it through the machine.


Starting from 2" off of the center of the flap stitch along the outside edge, make sure that you don't catch your straps in this seam, you want to fold them to the inside. Stop stitching 2" off center on the opposite side, this will leave a 4" opening at the center of the flap.  This will allow you to turn the bag right side out and allow you to have beautiful clean finished edges.


Once you've stitched around the outside edge turn the bag right side out pushing the lining inside of the exterior fabric.


Now you have to turn the seam allowance of your opening to the inside and you can either hand stitch the opening closed or top stitch it closed.  I top stitched around the top edge of mine.


All that you need to do now is place and rivet your snaps on.  I used my clear ruler to mark where the snap needed to go.  Then I took my awl and put a hole through all the layers so that I could put my snap through.  Then I hammered my snaps together.


As you can see I also added my own little label to the flap.  I'm not selling it, but I just love how this looks.  I think it adds a polish to the whole thing.

And we're done!!! HOORAY!!!


Let me know if you need any help with any of the steps.  I'm happy to show you anything else you need!

-Caroline