When the weather forecasts torrential downpours and thunderstorms what choice is there besides wear a cute dress that makes you feel happy and sunny. Even Deb wore a cute dress for just that reason! That is most likely a lie, I don't think Deb ever wears clothes for that reason. It was probably the cleanest thing close at hand.
The pattern is McCalls 4769. Far and away one of the best patterns I have stumbled upon.
My understitching tutorial will be up tomorrow. Hope it's drier where you are!
-Sweet Caroline
Last year I discovered Project Sewn. I was immediately enamored. I participated in their community participation sew-a-long last year with the Coffee Date Dress. I used the pattern and turned it into a peplum top, blogged here.
This year knowing about it ahead of time I am really pushing myself and I have plans for sewing along with the challenges. This week's challenge was Floral Frenzy. I was going through my stash trying to land on what I would make and the bright pop of the fabric I bought on my shopping trip to Grey's Fabrics in Boston really caught my eye.
I tend to shy away from a lot of floral prints but I couldn't resist the pop of these poppies. I decided to make a skirt and a blouse, with the poppies on the bottom and the bright red fabric for the top. I started with the skirt, with my time frame in mind.
The skirt is my own pattern. It was originally a four gore skirt, but to avoid breaking up the print I cut the front and back panels on the fold making two large pieces rather than four smaller ones. What I am most in love with is the pockets. I think the contrast fold back really sets the skirt apart.
In addition I painstakingly pattern matched the pockets. I'm really glad I did it. I think it looks nice and is a sign of quality.
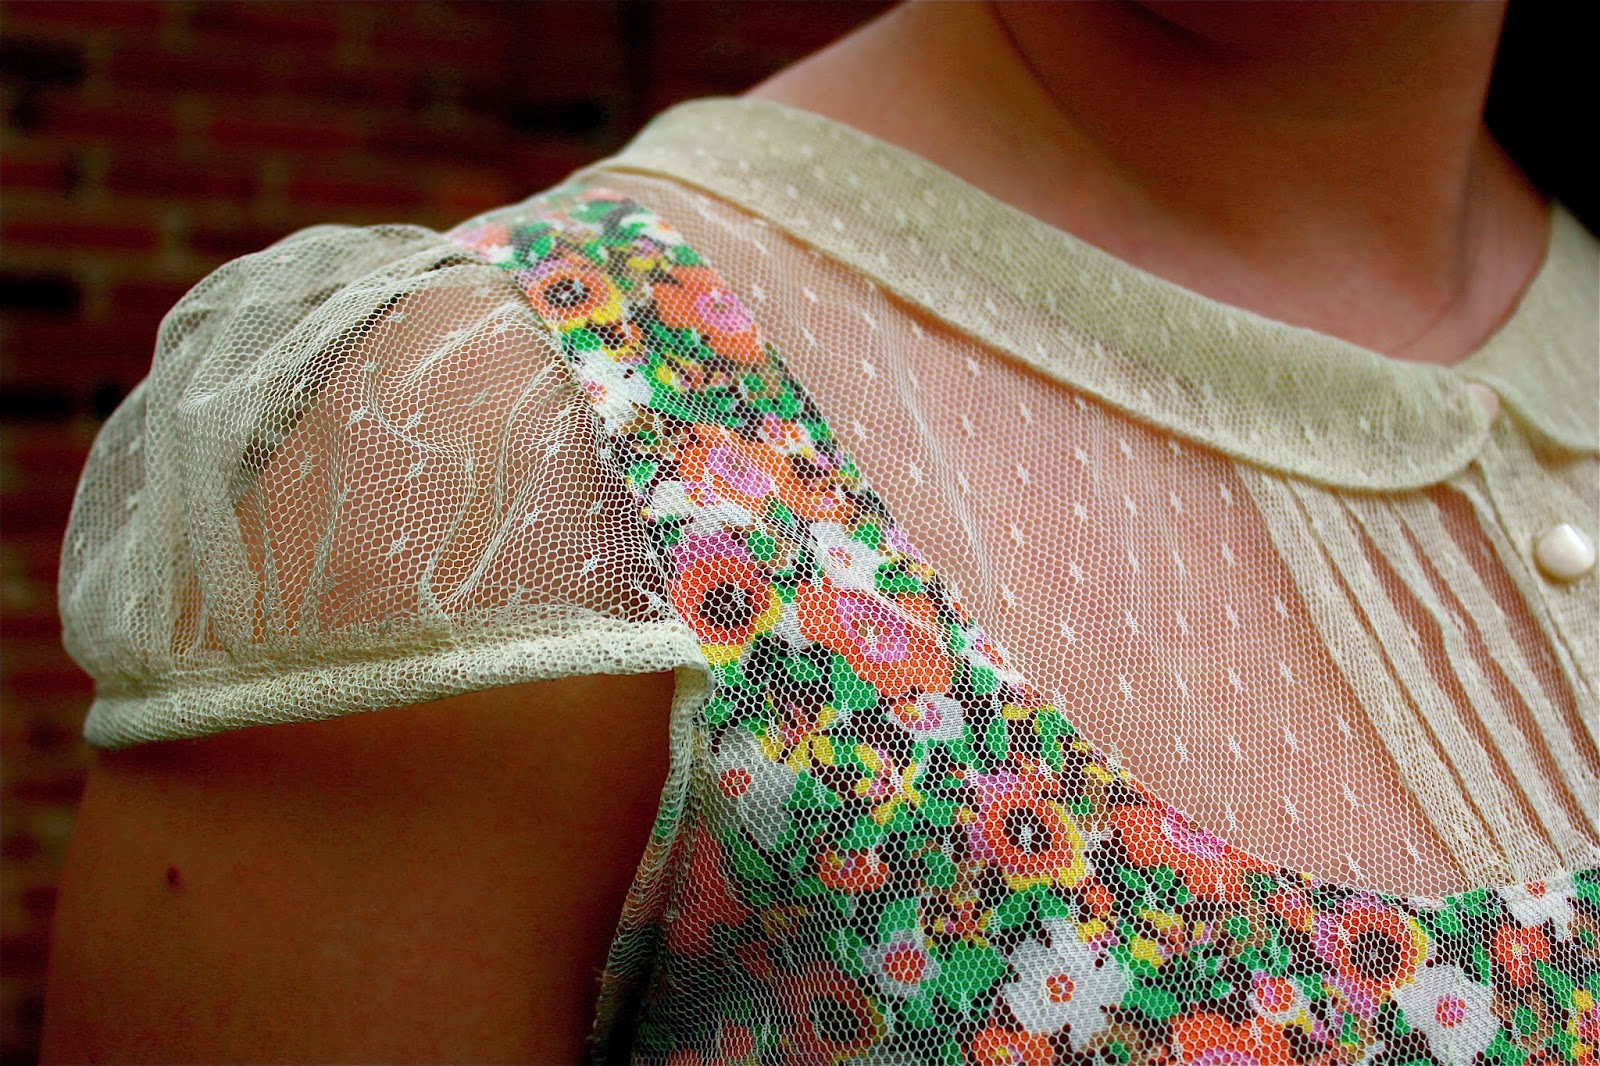
For the blouse I used Gertie's Portrait Blouse pattern. It's one of my favorite and most repeated patterns. Making a solid top I really wanted to do some embroidery on one of the shoulders as an added feature. To give it some of the appeal of the skirt I photocopied a section of the skirt fabric. It was a dark copy so I traced the lines I wanted to use in sharpie.
What this did was to transfer the details of the pattern onto the back of the copy. This made it easier to see the lines I wanted when I trace them onto the fabric.
In order to see the lines a little better I pinned the fabric to the photocopy and then taped it to my oh so sunny window. With the lightweight of my fabric it made it easy to see the image to trace it.
In the end I decided not to stitch the stems and leaves. I made an executive decision that I didn't need any stems trailing across my bustline. I am extremely pleased with how it turned out.
My finished garment:
I feel great in this outfit. It's bold and it makes me happy to just have it on. The length and shape of the skirt is feminine and flirty. I'm just absolutely in love!
-Caroline
P.S.
My lovely wife would also like me to tell you that we gave this dresser an extreme makeover, new paint and drawer pulls. We really like color, can you tell?
I feel like everyone has the one item that they immediately think of and beam with pride. What is interesting is that it's not always the the item you spent the most time or money on. For me the projects I fall in love with are those where I go out of the box and put all my creativity into.
The dress I wore today had all of that in it. It is a dress I did for the Colette Patterns Laurel competition. I entered it specifically in the self-made fabric category. I dyed the fabric, screenprinted the motif, and then I did all of the embroidered embellishments. I can't get enough of this dress, it is probably the most complimented dress I've made.
Over time the green I had dyed it did fade a little but it is still a blast to wear. I just love the way I feel in this dress. I'm confident, sexy, talented and hot, and that really shines in this dress! Here's the close up of the central motif.
I then thought of this great scissor detail for the petal sleeve.
Finally what would a tattoo dress be without a cut out for my tattoo!
I've shared one of my absolute faves with you all today, what's the "it" item in your closet? Leave me comment so I can get a feel for what you love.
I am really loving Me Made May. I have never done this before and I think it's great. Not only has it inspired me to wear more of my makes it has also encouraged me to be a better blogger. It's pretty exciting.
The dress I wore today was one of the dress I made for Colette Patterns Laurel sewing competition. It's one of my favorite and most complimented dresses. It was nominated for the fan favorite category, something I must say I was incredibly proud off.
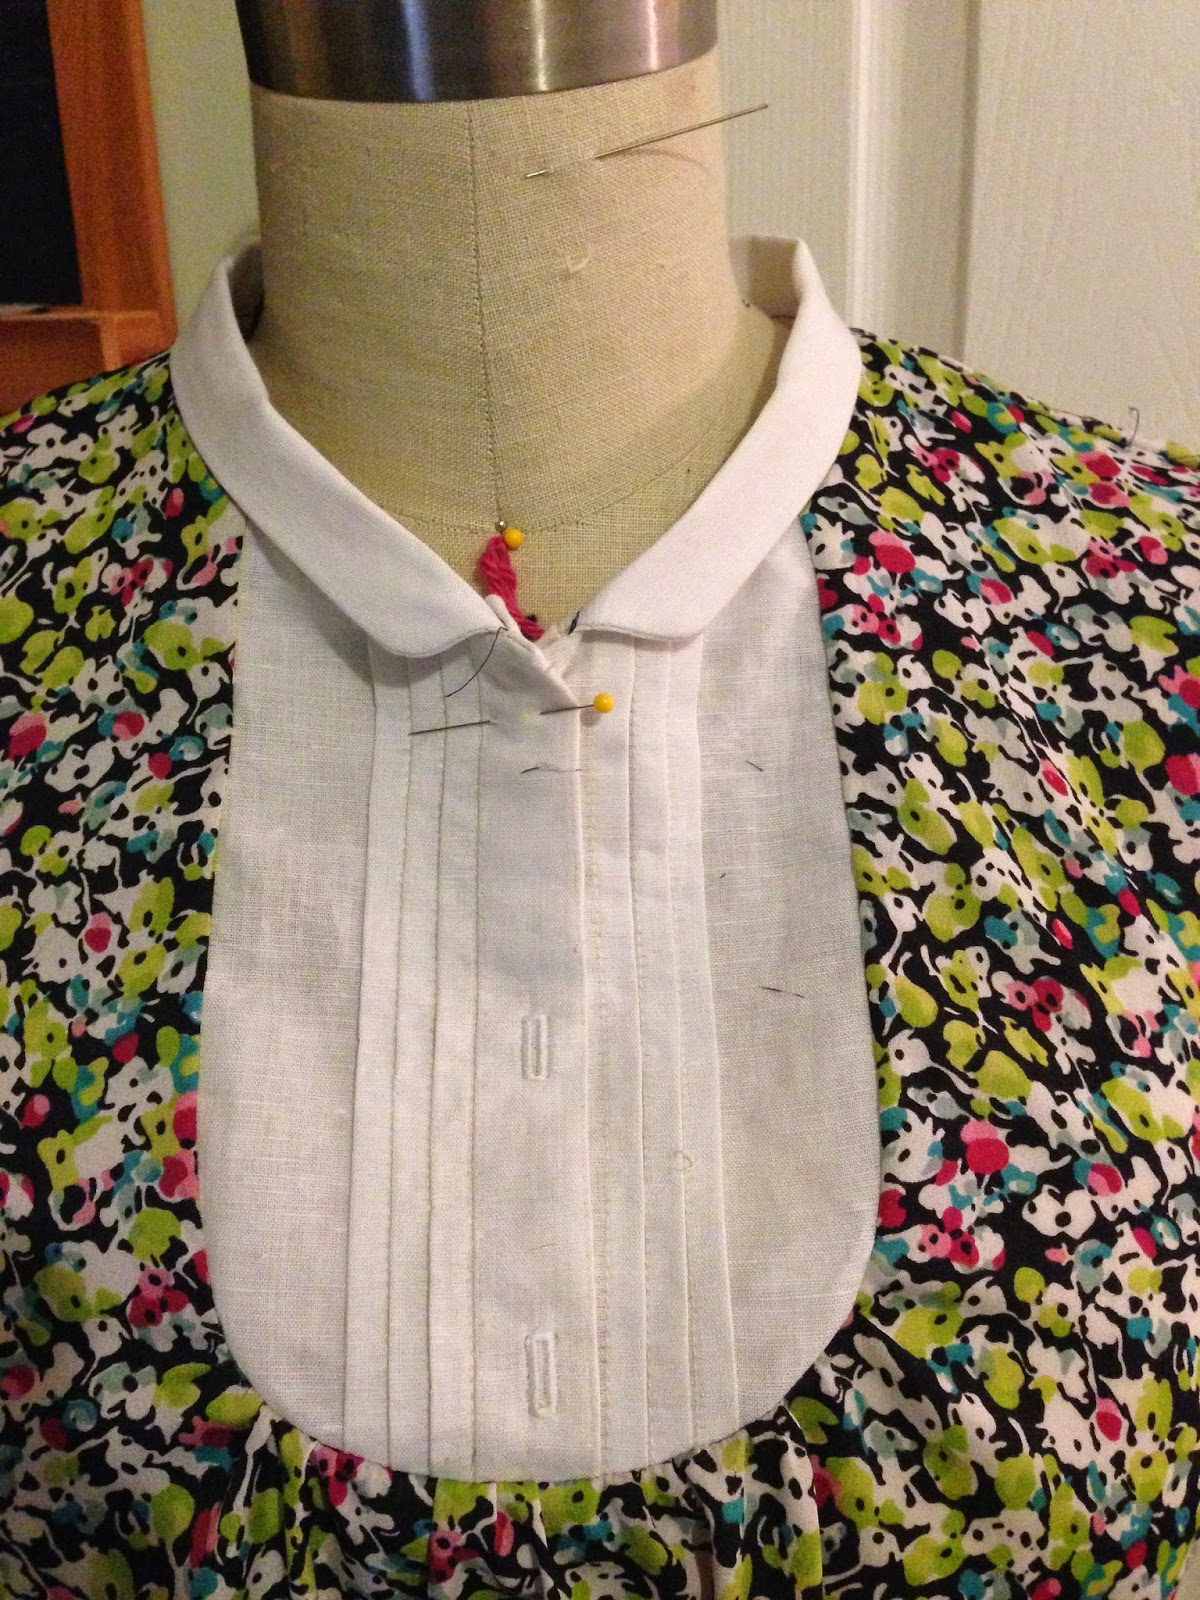
I was in a terribly unphotogenic mood today so I do apologize for that. This was one of the first times I really enjoyed working with overlays. Here's a close up on the Peter Pan collar and pin tuck work (my favorite part).
A close up on the cap sleeve action.
One final look at the whole kit and caboodle.
I hope you all are enjoying Me Made May as much as I am. Let me know what you think, I'm having a blast.
I'm going strong with #MMM14. Today was no exception. I rocked my dress form applique dress from the Colette Patterns Laurel contest. I made quite a few of that awesome pattern and this was definitely a fave. When I got home from work I had my awesomely wife take my picture. She took a few and when I looked at them I saw that I had an awesome little photo bomber.
Awesome dress beautiful yard, pretty basic, but wait.
I was having a conversation with my sewing sidekick Rachel about understitching the other day. She was making this amazing dress for a gala she had a hand in for The Bridge a local arts initiative. She was querying over finishing methods for lined garments. I brought up understitching and so we began to tumble down that rabbit hole.
Her big issue was that she was using a solid lining but her dress itself was heavily patterned. She was concerned about the lining popping out over the top of the neckline and ruining the effect of her awesome graffiti print dress. She decided to understitch it, which made me think that I should do a blog tutorial on understitching.
***But first a shout out for Rachel's awesome dress (and her purple hair):
Now for reals...UNDERSTITCHING
1) Assemble to the point of attaching your facing: I have assembled the garment to the point where it is ready for the facing to go on. I made sure to press open my seams so it will be easier when I start to stitch the facing on.
2) Stitch facing on: I am going to work on the neck edge of this garment. With right sides together, pin your facing on, matching the shoulder seams and any other marked notches.
Next stitch around the neck edge.
3) Clip: You are going to want to clip to within an 1/8" of your stitch line around the curves of your neck edge. This will help the garment to lay flat when we turn and press it. I have also clipped my corners. I was careful not to clip too close to the corner's edge. I don't want it to frey and look like garbage.
4) Turn: Turn your garment right side out. If you have a corner using a turning tool can be useful to get a really crisp corner.
5) Press: Ironing is crucial to sewing. It can be a huge pain in the rump but if you take the time to iron frequently you're end result will look a lot sharper and more professional. One thing that helps to get a good press on the edge you've just sewn, is to roll the seam between your fingers as you press along the garment.
6) Understitching: Since my garment has corners at the center back it is difficult to start my understitching right at the very end. To make my life a little easier I started my understitching about 1" in from the edge. Believe me there is no reason to make yourself mental over something that won't be a huge deal. Just get as close as you can. Backstitch when you start and then stitch with your seam riding along the edge of your presser foot. When you've gone as close to the opposite edge as you can get, backstitch again.
7) Press: I know you're saying to yourself, "WHAT? Press again?" Yes my comrades, press again. Then you're done with your understitching.
I'm pumped that I was able to bring you a little video action with this tutorial. Special shout out to my absolutely awesome wife Deb for her camera work and mad editing skills. She basically helped my videos not look like crap. She also saved me from having to juggle a camera with one hand and demonstrate with the other. Simply put, she's amazing, that's why I had to marry her.
I have been sick the past few days and that made #MMM14 an interesting situation. How do I keep up with wearing a make a day in PJs? Well the answer is you wear your awesome bathrobe that your wife said she was going to make for you, which translates to, "Honey I bought you a project to finish."
To be fair my lovely wife had good intentions, however when it comes to sewing I am such a control freak that I couldn't let go enough for her to fly solo. Basically I wanted something that I could wear and be comfy in. She wanted to cut a head hole in a piece of fabric and call it a day. I just can't make a poncho work. She did help me cut the fabric and she actually sewed the shoulder seams. Love in every stitch, then she got bored.
This bathrobe is made from sweatshirt material and is incredibly comfortable as well as being comforting when one is sick. Working toward feeling my best. Hooray for Me Made May.
Here is what I would like to say about my first Sew for Victory experience, I went initially against my better judgement and it was not the most successful make ever. I really wanted to to play with gathers and make a very femme silhouette. This how ever backfired for me a little bit. In my heart of hearts I knew I was not a gathers girl, but I tried to lie to myself about the shape of my body, this was not my best plan. I'm more a pleats than gathers girl and I shall never again forget it.
This project all started with the drape. I had a lot of fun making it regardless of the fact that the end result was not 100% my style. There are a lot of process shots for this project so please enjoy.
After the parts were draped I made sure to mark them really well so I wouldn't miss anything when I got to the patterning portion. Here comes the Pattern Drafting!
What I've learned with my experience in draping and patterning is that it is hard to do one without the other. My large strength is pattern drafting and it is hard to get a really fit on a drape if you don't know how to correct the pattern pieces when you draft.
Next it was time to get down to cutting and sewing.
My favorite part of this dress is the plackit and small Peter Pan collar. While I may not repeat this dress again verbatim, the collar action with definitely be happening again.
Now for the end product.
As a sewcialist I like to think of all my projects as an opportunity for learning and growth. I definitely learned and grew with this project. Things I learned:
I am starting to really enjoy draping and I will need to do more of it.
Gathers at least along the bustline are a little doubty on me and should not be repeated.
Working in fabric other than 100% cotton is a fun challenge but if I decide to do it again I will drape in something with a similar weight.
I did do a second project which I will write up later that is more my style. I can't wait for the round up and to see what everyone else has done. Once again a big thanks to Rochelle from Lucky Lucille for this awesome sew-a-long. Definitely one of my favorites.